In this tutorial, we will guide you through setting up Java development environment including JDK and Eclipse IDE.
There are three main software development kits (SDKs) available for developing different kinds of Java applications.
- Java SE (standard edition) software development kit (SDK) is mainly used for developing desktop-based applications. Java SE SDK is also known as JDK.
- Java ME (mobile edition) is used for developing MIDlets and Xlets applications that target mobile and television-oriented devices. Java ME requires JDK installed.
- Java EE (enterprise edition) is used to develop component-based enterprise applications such as Enterprise Java Bean(EJB), Java servlet, and JSP. Java EE requires JDK installed.
In our Java tutorial, you will focus solely on the core Java language so you only need to install JDK.
Installing JDK
Before installing JDK you have to download it. In order to download JDK, please follow the steps below:
- First, go to Oracle website, Java SE download section.
- Second, click on the download button to jump to the download page.
- Third, click on the “Accept License Agreement” radio button to accept the license agreement, and choose the appropriate JDK for your system e.g. Linux, Windows, Max OS X or Solaris.
Installing JDK is quite simple and straightforward. Just double click on the downloaded file, accept the terms and follow the default settings. If you are using Windows, the Java installer will install Java in the folder C:\Program Files\Java\jdk1.7.0_10 you can change it during the installation process to C:\Java\jdk1.7.0_10. Notice that we installed Java SE Development Kit 7u10 version.
The Java installation folder C:\Java\jdk1.7.0_10\bin contains several useful and important tools:
- java: is a tool for running Java application
- javac: is a tool for launching the Java compiler to compile java source into bytecode.
- javadoc: is a tool for generating HTML documentation from Javadoc comment.
- jar: is a tool for packaging class files and other files into a special archive file with .jar extension. By the way, jar stands for java archive.
To run those tools via command line window, you can do it in the following ways:
- You must specify the full path every time you run the executable file e.g. C:\Java\jdk1.7.0_10\bin\javac.exe, which is not convenient.
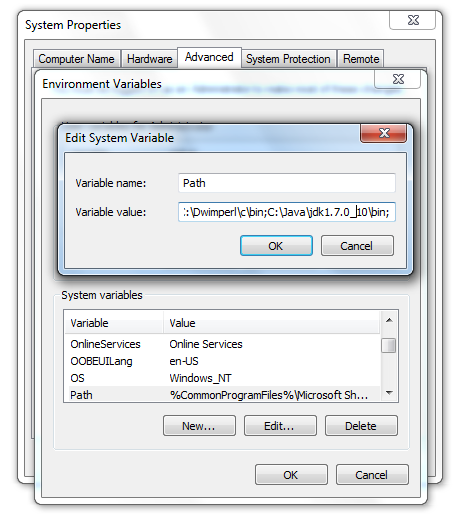
- Changing the PATH environment variable and use just the name e.g., javac or java. You can follow the How do I set or change the PATH system variable to change your PATH in your system.
If you are using Windows, you will see the PATH looks like the following picture.
Now you can execute the Java tools such as java and javac as the picture below:

To develop Java application, JDK is all you need. However, all developers use Integrated Development Environment (IDE) for developing java because the IDE makes developing Java application faster and easier. Let’s go to…
Setup Eclipse IDE
Eclipse is a popular and free IDE. It provides you with a set of very useful tools for developing Java applications more quickly. You need to follow the steps below to setup eclipse:
- First, go to the Eclipse official website, download section.
- Second, download the Eclipse IDE for Java Developers installation file.
- Third, unzip the downloaded file into a preferred location in you hard-drive for example C:\eclipse
To launch Eclipse IDE, go to the eclipse installation folder (C:\eclipse) and double click on the eclipse.exe execution file. Eclipse will ask you a folder called workspace where it stores your Java projects. Enter a folder for the workspace like c:\javaws and click OK button.

The following is the welcome page of the Eclipse IDE.

In this tutorial, we’ve shown you how to set up a Java development environment including JDK and Eclipse IDE. We hope you get it done correctly. If so, you’re ready to go to the next tutorial.